top of page


What if you could live in your dream home?
Here was my answer to that with Lenovo's Yoga Slim Laptop
#LenovoJustBeYou
Barren and empty, my new college apartment was not it. I decided to upgrade my living space by giving it some ✨spice✨. But here's the catch: I made it all on Blender.
Step 1: Idea to paper
My first order of business is always putting my ideas onto paper in my trusty notebook. I sketched out the first things that came to mind and refined the blueprints until it looked good enough to live in..
I had to sketch out the layout of the house, keeping in mind how I would use it in a short video as well.

Rough Draft 1
Picking the rooms and activities for each room, rough sketch of a mushroom home concept

Rough Draft 2
Finalizing structure and room amenities of a modern home, including basic furniture and textures
Step 2: Inspo Board
Next, taking inspiration from the brightest corner of the internet (**cough* Pinterest*), I pulled some room inspo to bring my dream home aesthetic all together. I leaned on my current favorite interior design aesthetic, Danish Pastel. This included bright colors, warm and friendly lighting, and a maximalist space perfect for one but great for guests.
Bathroom
-
Funky wallpapers
-
toilet with a personality
-
great place to take a bubble bath
-
plant friendy
Bedroom
-
best place to fall asleep watching netflix
-
safe place
-
waking up from a great dream


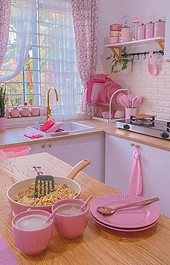
Kitchen
-
The best place to make omlettes and late night coffees
-
must have: cute dining table and chairs

Living Room
-
perfect for hosting board game nights
-
optimal for solo chill days and spilling tea over facetime


Step 3: Paper to Blender
With the blueprint and bulletin board done, I took to blender and got started on modeling everything, from the kitchen cabinets to the books on the shelves. Then I applied the respective textures, colors, and added lighting.
During this period, I also had the honor of sharing my content ideas and models with @Marble.Mannequin, an expert in the 3D modeling and animation field. I received a lot of advice that helped me cut down on some repetitive processes to achieve a more efficient workflow.


After 6 hours of pure drive, non-stop clicking and 4 cups of coffee, I finally finished modeling and rendering my dream home.
And here was the final result! 👇


But my job wasn't finished quite yet.
I still had to share my behind-the-scenes and creative video with the internet.


Step 4: Filming & Editing
With the home modeled and rendered, all that was left was to actually make the TikTok/reel that Lenovo had asked for. How could I really bring the idea home? A timelapse video, show and tell, a sit-down-and-do-an-ad-read?
I figured if I was going to make a "home," I might as well live in it. So that's exactly what I did. Using Tiktok's greenscreen filter I used that to show a creative twist to my "day in the life", implementing the Lenovo Laptop in the process.
Check out the final video here and the BTS video here!
Video Snippets: Living in my Dream Home🏠


⭐Results⭐


bottom of page